
In this series of posts I will describe my own C# based Home Automation platform FruitHAP
What is FruitHAP
FruitHAP is my home-made home automation system, designed to run on a Raspberry Pi. The name stands for Fruit Home Automation Platform and is a pun on the Raspberry Pi (since you all know that a raspberry is fruit). Also ‘Fruithap(je)’ in Dutch is the word for a plate of mashed fruit you give to a baby; something like the picture below
Why did you make your own system, since there are already lot of other HA solutions
I have a house with an attic and since this my ‘man-cave’ i sit/work there a lot. The only problem is that I often can’t hear the doorbell ring, especially if the washing machine is also turned on (it’s on the attic as well and it’s noisy). So I came up with an idea to make something that delivers a notification to my cellphone when someone rings the frontdoor bell. Oh, and maybe it’s also convenient to put an image of the person standing there in the notification, so I can decide if it’s worthwhile to go downstairs and answer the door.
Then I bought a Raspberry PI, a wireless doorbell, a camera and some other stuff. Now I needed some software to make this setup work. I looked first at some existing HA platforms but decided that they didn’t put up to my expectations, so i decided to build my own. (it is a lot more fun too)
Requirements
I came up with some requirements for my platform:
- Extensible I heard that automating your house is addicting. It shoulde be easy to add different sensors and sensor types, since there are a lot of standards of sensors out there.
- Accessibility of sensor data It should be easy to access sensor data from other systems/apps. Maybe you want more than only notifications on your phone, maybe you want to have a dashboard with all your sensor data or log
your energy consumption to a database to perform some analysis on it (BIG data is hot these days) - It should run on a Raspberry Pi
- Open source
General overview of the platform
A high level overview of the platform is in the diagram below. I will explain it a bit in more detail.
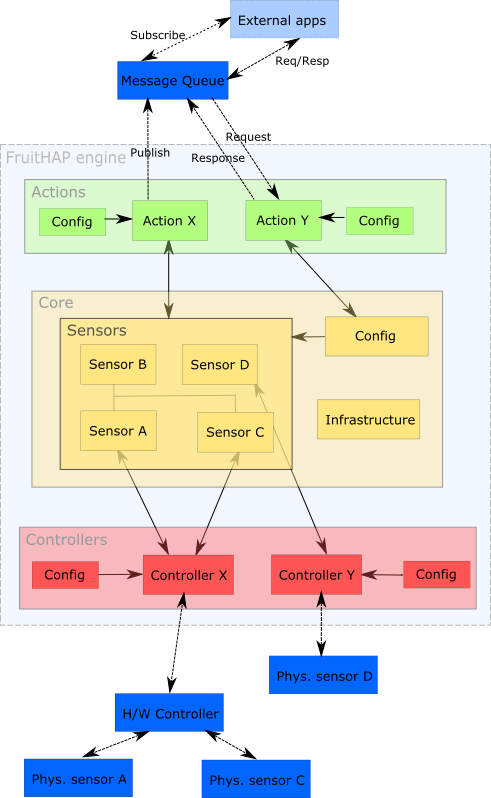
Engine
The main part of the system is called the Engine. This is a daemon that runs on the Raspberry Pi and acts as the gateway between the actual physical sensors and the ‘outside’ world. The engine communicates with the outside world by means of a message queue, so external applications can easily interact with the system by reading/writing into this queue, through a publish/subscribe mechanism or request/response mechanism. (RPC calls)
For example, when the doorbell rings, the event goes from the doorbell through the engine and finally got published in the message queue. An app running on a phone can listen (subscribe) to this event on the queue and send a notification when this event is fired.
An example of request/response is when an external application wants to read the temperature of a certain sensor. It sends a request to the message queue which the engine handles by retrieving the value from the sensor concerned and sends it back (through the queue) to the external application.
The idea is that all the configuration of the engine and the other components will also be exposed in this way to make it easier to make a nice web interface for configuring everything, but that’s another story for another time.
Controllers
The ‘lowest’ layer is the controller layer and it handles all nitty-gritty low level hardware protocol stuff. It communicates directly with the sensor hardware or through another hardware controller, such as a zWave or a 433 mhz controller.
Sensors
The sensor layer is the most important layer and is considered the core of the platform. These contain virtual representations of the physical sensors/actuators and use the controllers to communicate with the actual sensors so that all hardware/protocol specifics are abstracted away (only the configuration for a sensor exposes some of the specifics)
For example one of the actuators supported is a KaKu button. KaKu stands for KlikAanKlikUit and consists a whole range of actuators/sensors/device with a specific communication protocol. Each device has an unique device ID and some more specific settings. These have to be set only in the sensor configuration with an unique name and for the rest of the system and the outside world it is known as a button with that particular name, which can be ‘pressed’.
Sounds difficult? No worries, in the next post when I will describe my setup it will all come together.
Also it’s possible to have ‘aggregate’ sensors, a sensor that combines the input 2 or more separate physical sensors in a way and use this as one value. This is comparable with some of the Android ‘logical sensors’. An example is a ButtonCamera, it combines a Button and a Camera, so when the button is pressed an image from the camera is retrieved and is sent along with the button pressed event as if it was one physical sensor.
Actions
An action is actually the interface between the sensor(s) and the message queue. Its input(s) is/are coming from either the sensors or from the outside (messages from the queue) and its< outputs are requests for sensors or other parts of the system (configuration!) or messages that are bound for the queue. Basically is this a rule engine where you can implement all kinds of scenarios for your home automation needs A standard action is for example to send a message to a queue every time a sensor updates. These actions can also have specific configuration.
Phew.. that was a lot of reading
This is just a short description of the system. If you have any remarks or comments about this post please let me know Next time I will show you an example of how this thing works. The example is actually my live doorbell setup When the doorbell rings FruitHAP is picking this up and a notification with a image from a camera is sent through Pushbullet to my phone More details about this in the next post..
Since FruitHap is open source, here is a link to the source. If you can’t wait to try this thing (and you have the right equipment) you can also find here a quick setup with a complete Raspberry Pi image.
See you next time!